Polk Speaker Box enclosure design diy how to building
subwoofer box
projects loudspeaker plans enclosure
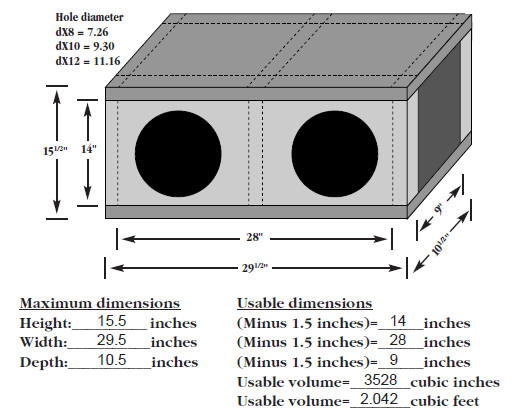
dX8, dX10, dX12

Parts You Will Need To Build Your Enclosure
When building a subwoofer enclosure you will find that there are
numerous materials
recommended for construction.
1) Medium density fiberboard (MDF)
2) Marine grade plywood
3) Particle board (the smaller the particles the better)
These materials range in price as well as availability. Particle board
is the most common,
least costly, and can be purchased at most hardware stores. MDF and
marine grade plywood,
although preferable, are usually much harder to find, and much more
costly. Whichever you
choose, we recommend that its minimum thickness be 3/4". This will
provide the rigidity
necessary for optimum performance.
Complete Parts List:
1) Wood (particle board, MDF, or marine grade plywood) 4' x 8' x 3/4"
sheet
2) Wood glue (one 12-16 oz. bottle)
3) 11/4"x #8 wood screws (one lb. box)
4) Caulk gun and silicon caulk (two tubes)
5) Terminal cup (one per speaker) available at electronic parts stores
6) Speaker wire (2-4 ft.)
7) Carpet (optional)
8) Grills to protect your subwoofers (optional)
9) Solderless speaker connectors (available at electronic parts stores)
By looking at the chart at the end of the technical sheet, you find
that this usable
volume is slightly more than double the recommended volume for a single
dX10, in
either a sealed or vented enclosure. Assuming that you will be using a
pair of woofers,
this will work out well.
If you are using a single subwoofer, you can cut your width in half.
Since we will
be using a pair of dX10 subwoofers, for our sample enclosure, we now
need to determine
the center divider displacement. This can be figured out by multiplying
the height x depth
x thickness of the divider (in our enclosure the thickness of the
divider will be the same
as the rest of our enclosure, 3/4") and subtracting that number from the
total usable
cubic inches.
You now have all the dimensions you need to begin cutting out your wood.
The
illustration on page 7 shows a diagram of the enclosure with all the
panel sizes that
need to be cut.
After you have cut all of the wood, it’s time to start assembling your
enclosure. Before
you assemble your enclosure there are a few things we recommend doing.
You will need
to cut out the hole for your Dynamic Balance® subwoofer and your
terminal cup, and
pre-drill the holes for your screws. The terminal cup is a connector
that allows you to
plug and unplug the wires from your amplifier into the enclosure. You
may want to have
a buddy help you with assembly, since it’s hard to hold the pieces
together and assemble
them at the same time. When building your subwoofer enclosure we suggest
that you use
wood glue in combination with wood screws for the strongest joint. We
also suggest that
you use one screw about every three inches along the seams of your
enclosure. Assemble
the enclosure as shown in the above diagram but leave one side off. We
suggest that you
leave off the baffle board, this will allow you to seal your enclosure
more easily, and an
air-tight seal is crucial! The best way to insure an air tight seal is
to seal the inside of your
enclosure with quality silicone caulk. This also includes sealing around
your input terminal
cup, and if you are using a ported enclosure, around your port. It is
not advised to use
silicone around your subwoofer when mounting it to the baffle. Instead,
we recommend
using the foam gasket weather stripping supplied with your dX subwoofer.
When mounting
your subwoofer to the baffle board, pre-drill your mounting holes. This
will make the
mounting of your subwoofer easier and will help prevent damage to your
subwoofer from
a slip of the drill. When securing your subwoofer to the enclosure we
recommend using
bolts and tee-nuts, but if you prefer, you can use wood screws.
Whichever you use make
sure they are at least 1.25" long. This will insure a good grip into the
wood.
One last thing you could do to your enclosure before installing it, is
stuff it. The
primary reason for stuffing an enclosure is to “trick” the woofer into
thinking that the
enclosure is larger than it actually is. You would want to do this if
you build your box
smaller than the recommended size. By stuffing the box you can build the
box as much
as 10% smaller than recommended, and achieve the same net result as the
full size
unstuffed box. The easiest way to do this is to use dacron pillow
stuffing. It can be bought
from craft stores fairly inexpensively. The rule of thumb for “stuffing”
your enclosure is
1 pound of dacron per cubic foot. When putting the Dacron into your
enclosure, do not
pack it in, rather place it evenly around the inside the enclosure. When
stuffing a ported
enclosure it is important not to obstruct the port or the vent on the
back of the sub
with Dacron.
Although your new dX subwoofers were designed to work in a wide variety
of enclosures
and configurations, we have included only the most popular ones. For
more enclosures and
configurations, please contact your local authorized Polk Audio dealer.
We hope that this
manual has helped to take the mystery out of designing an enclosure for
your new Polk
Audio dX Subwoofers.
|
